Wheel Offset Calculator Guide
Use a wheel offset calculator correctly: compare inner and outer clearance, then verify the real fitment details.
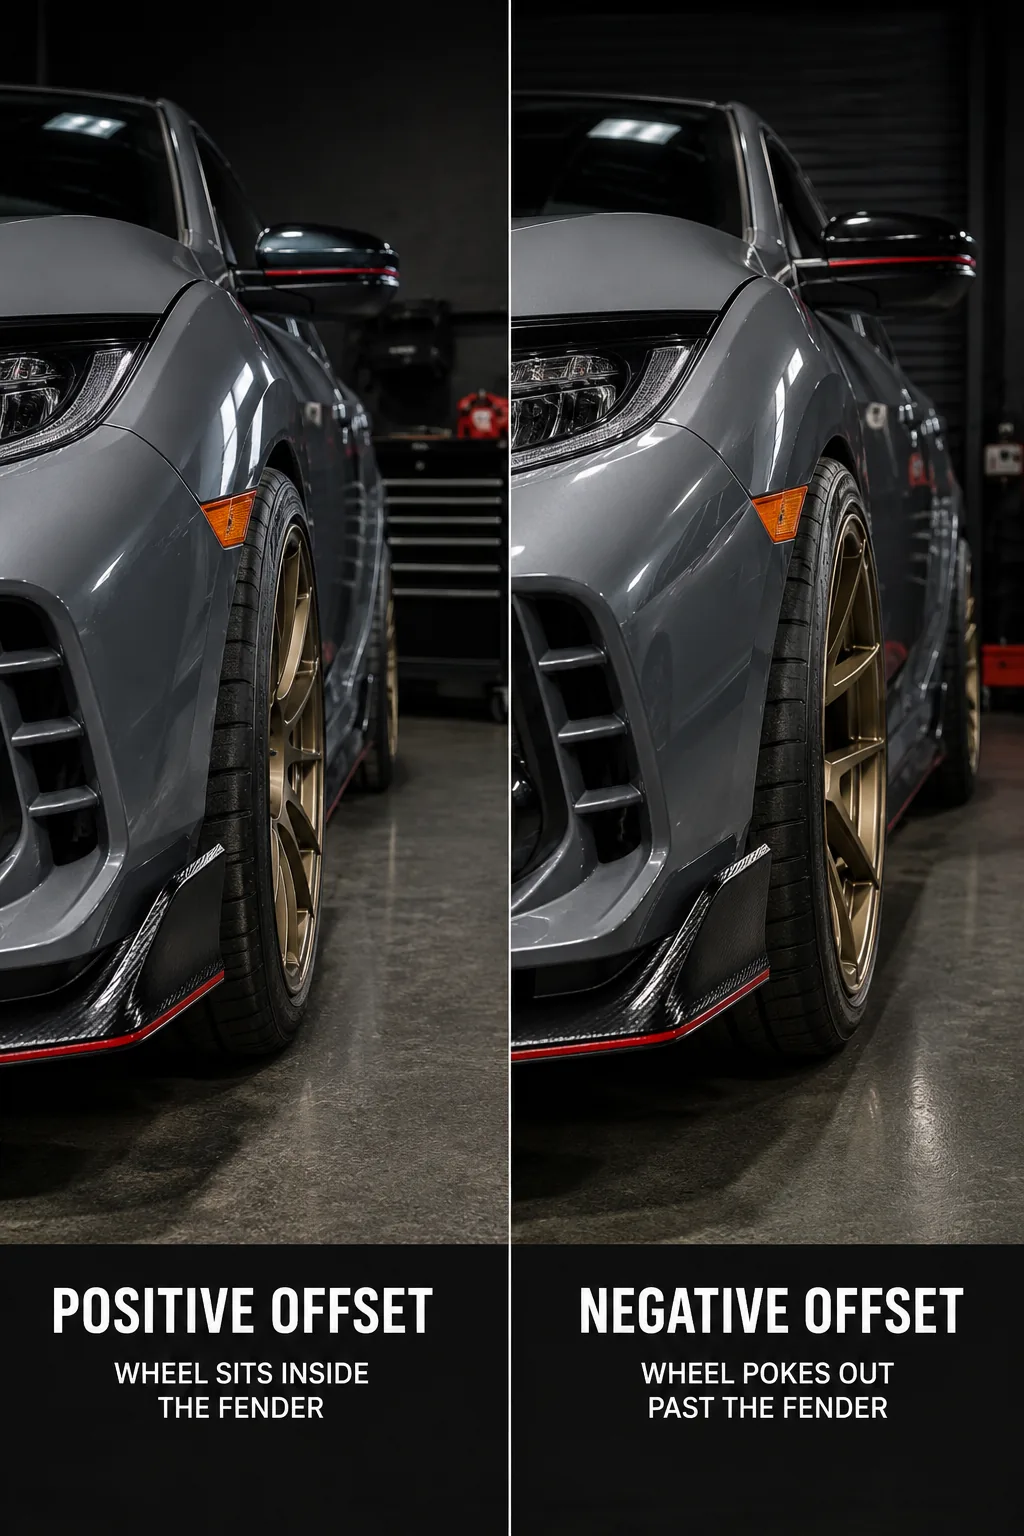
Wheel Offset in Plain English
Wheel offset is the distance between the wheel’s centerline and its hub-mounting surface, measured in millimeters. Positive offset means the mounting surface sits toward the wheel’s outer face; negative offset means it sits toward the inner barrel. This one measurement helps determine whether a wheel sits farther inboard near the strut or farther outboard toward the fender. It does not describe wheel width, center bore, bolt pattern, brake clearance or load rating—those must be checked separately.
| Change | Inner clearance change | Outer position change |
|---|---|---|
| Lower offset by 10 mm | Wheel moves 10 mm farther from suspension | Wheel moves 10 mm farther toward fender |
| Higher offset by 10 mm | Wheel moves 10 mm closer to suspension | Wheel moves 10 mm farther inboard from fender |
| Add 10 mm spacer | Same effect as lowering offset by 10 mm | Same effect as lowering offset by 10 mm |
How to Use a Wheel Offset Calculator
A wheel offset calculator compares the old and new wheel. Enter current width and offset, then new width and offset. The output normally shows how much closer the inner wheel edge moves to the suspension and how much farther the outer edge moves toward the fender. This is a comparison, not a fitment guarantee. A calculator does not know your tire’s measured width, wheel spoke profile, brake caliper shape, camber, suspension travel or fender liner.
For a Type R, begin with the wheel and tire that are already proven on your car. Measure current clearance where practical. Then evaluate the new wheel, add the tire maker’s measured section width, and check at full steering lock and suspension compression. A static garage photo is not a clearance test.
Width and Offset Work Together
Wheel width is measured bead seat to bead seat, while the advertised outer lip can be wider. When you add width, half of that added width moves inward and half outward if offset remains unchanged. Offset then shifts the entire wheel. For example, a wheel that is one inch wider adds roughly 25.4 mm overall, or about 12.7 mm to each side before the offset change. Moving offset by 10 mm changes both edges by 10 mm.
This is why two wheels can both be called “19 x 9.5†yet fit very differently. The offset number tells you where that 9.5-inch barrel sits. Tire model adds another variable: a wide-shouldered 265 tire may be closer to the suspension or fender than another 265 on the same wheel.
Spacers: Calculation Does Not Equal Approval
A spacer reduces effective offset by its thickness. A 5 mm spacer on a +45 wheel behaves approximately like a +40 wheel for positioning. That arithmetic is useful, but the hardware requires its own checks. Hub-centric fitment, sufficient thread engagement, appropriate stud length and torque procedure are not optional. Avoid stacking generic spacers. If a spacer is needed for brake or strut clearance, use a quality part designed for the application and have a qualified installer inspect it.
Type R Fitment Considerations
The FL5’s OEM 19 x 9.5J wheel and 265/30ZR19 tire provide a strong reference point. When changing wheels, ensure the spoke design clears the large front brake hardware. Barrel clearance alone is not enough; caliper-to-spoke clearance matters too. The FK8’s factory 20-inch package presents its own brake-clearance and tire-sidewall considerations. Both generations can rub if width, offset, tire dimensions, lowering and alignment are combined carelessly.
Use a wheel maker’s brake template when supplied. Confirm bolt pattern, center bore or hub-centric ring needs, wheel load rating and lug-seat type. A wheel can have the correct diameter and offset but still be unsuitable because its seat profile does not match the lug hardware or its load rating is inadequate.
A Practical Fitment Checklist
- Record current wheel width, offset, tire model and tire size.
- Compare inner and outer position with a calculator.
- Check brake barrel and spoke clearance using a template if available.
- Check tire clearance at steering lock and compression, not only at rest.
- Confirm bolt pattern, center bore, load rating and lug-seat compatibility.
- Re-torque wheels to the vehicle specification after installation.
Frequently Asked Questions
Is lower offset always more aggressive? It generally moves the wheel outward, but “aggressive†is not a safety standard. It can cause fender contact or steering issues.
Do wheel spacers change offset? Yes. A spacer reduces effective positive offset by approximately the spacer thickness.
Can a calculator tell me if wheels will fit? No. It compares position; it cannot verify brakes, tire dimensions, suspension motion or body clearance.
Why do two tires with the same size rub differently? Actual section width, tread shape and shoulder design vary by tire model and measuring rim.
What should I do after changing wheels? Inspect clearance, verify lug hardware and torque, set pressures, and consider alignment if other suspension changes were made.
Conclusion
Use a wheel offset calculator to ask better questions, not to skip inspection. Compare inner and outer movement, then verify brake, tire and body clearance on the actual vehicle. That combination is how you get the look and handling you want without a wheel-fitment surprise.
Deeper Planning Notes
Wheel-offset planning works best when the decision is documented before money changes hands. Write down the exact vehicle year, current parts, intended use, road conditions and the result you are trying to improve. That sounds basic, but it prevents the common situation where one change fixes a perceived problem while creating an unrelated clearance, comfort or maintenance issue. A wheel-fitment change should be evaluated in the context of the whole vehicle, because a Type R is a tightly integrated package rather than a collection of isolated catalog parts.
Use manufacturer instructions and the vehicle service information as the controlling documents for fitment, fastener procedures and maintenance. Product listings and owner discussions are useful leads, but listings can combine generations, show universal photographs or change over time. Before ordering, compare part numbers, application notes and exclusions. If a seller cannot establish the application clearly, pause rather than treating a similar-looking component as proof.
Budget for the supporting work. The best result often requires inspection, consumables, alignment or professional installation in addition to the visible part. A purchase that uses the whole budget can leave no room for fresh fluid, correct hardware, a post-install check or a tire replacement. In performance-car ownership, the unglamorous support work is usually what makes the modification dependable on a normal Tuesday as well as on an event day.
Make one meaningful change at a time when possible. It is far easier to evaluate a new component when wheel fitment, tire pressure, alignment, brake condition and engine calibration have not all changed in the same week. Keep notes on setup values, mileage, weather and impressions. That record helps you correct a problem and is valuable to the next owner if you eventually sell the car.
After installation, perform a controlled verification. Look for interference, leaks, warning lights, unusual noise and loose hardware. Test the car gently before escalating load. Reinspect after the first heat cycles or a short break-in period, then include the part in your normal maintenance routine. This is especially important on a vehicle that sees spirited driving, where heat and suspension movement reveal issues a driveway inspection cannot.
Be skeptical of universal claims. A part can be excellent for one climate, road surface, tire, driver and use case while being the wrong answer for another. Good buying advice names tradeoffs: comfort versus response, noise versus engagement, maximum grip versus longevity, and cost versus serviceability. Decide which compromise you can happily live with, then buy toward that outcome.
Finally, keep legal and safety requirements in view. Local inspections, noise rules, emissions rules and insurance requirements may apply to modified vehicles. Keep receipts and original components where practical. If you are unsure whether a change is safe or lawful for your use, ask a qualified installer or the part manufacturer before proceeding. A careful plan protects both the vehicle and the enjoyment that made you modify it in the first place.
Ownership and Follow-Up Checks
Once a wheel and offset change is in service, use the car normally before deciding whether another change is necessary. Early impressions are useful, but they can be distorted by unfamiliar feel, a new sound or the expectation of a dramatic difference. Check the basics first: tire pressures, fluid condition, fasteners, warning lights and any contact marks. These checks turn a modification from a one-time purchase into a maintainable part of the vehicle.
Seasonal conditions matter. The setup that feels excellent on warm, smooth pavement may behave differently in cold rain, on rough roads or when the vehicle is fully loaded. Revisit the decision with those conditions in mind. If the Type R is a daily driver, its real value is how consistently it works across the trips you actually make—not only how it performs in a short, ideal test.
Keep an eye on wear patterns. Uneven tire wear, unusual brake dust, new vibration, loose exhaust hardware or suspension noise should be investigated promptly. Do not treat a new symptom as normal merely because the car is modified. A quick inspection often identifies a simple correction before it damages a more expensive component.
Good documentation also makes future maintenance easier. Keep the product manual, installation invoice, alignment sheet, part numbers and a note of any settings. If you later change wheels, tires, pads or suspension, that baseline will help you understand what has changed and avoid starting fitment research from zero.
Finally, leave room for your priorities to change. A dedicated track build can justify compromises that become tiring when the car starts doing commuting duty. Conversely, a street-focused setup can be the correct long-term answer even if it is less dramatic in a parking-lot conversation. The most successful Type R builds are coherent, safe and enjoyable for their owner.
Make the Decision With Confidence
Verify the details twice: once before ordering and again during installation. Compare the part number, vehicle application, instructions and condition of the surrounding components. If a seller listing conflicts with manufacturer documentation, use the current manufacturer information as the deciding source. A specialist shop can often identify a clearance, electronic-control or labor requirement before the vehicle is apart.
Enthusiast upgrades reward patience. The finished setup should operate safely, feel intentional and make clear why that specific part was selected. Keeping receipts, fitment notes and original components where practical makes future maintenance and ownership easier.
Long-Term Use
Revisit wheel hardware and clearance after several weeks of real driving. Check torque using the vehicle specification, inspect the inner barrel and fender liner for witness marks, and watch for vibration that may point to centering or balance issues. This is a better test of wheel fitment than a static photo in a driveway.
Keep a record of wheel width, offset, tire model, spacers and lug-seat hardware. It makes seasonal swaps, future upgrades and troubleshooting much easier. A thoughtful offset choice should remain free of contact through normal steering and suspension travel, not merely look flush at rest.